Cloudflare Tunnel vs Port Forwarding, Why I Stopped Opening Ports on My Router
It was a quiet evening. I was sitting in front of my laptop, sipping coffee, when an email notification popped up. From my ISP. The subject line was short but alarming: “Warning Suspicious activity detected from your IP address.”
In this article, we cover Cloudflare Tunnel in a practical way so you can apply it with confidence.
My heart skipped a beat. I immediately opened the router admin panel. And there it was the firewall log was flooded with thousands of connection attempts to port 22 and port 80. Ports I had forwarded to access my homelab remotely.
“Who even knows my IP?” I thought. The short answer everyone. Or more precisely, every bot scanner on the internet.
That night changed how I think about remote access. I realized that opening ports on a router something I had always considered the “standard way” was actually inviting trouble. That same night, I started looking for alternatives. And I discovered Cloudflare Tunnel.
Anatomy of the problem: what’s wrong with port forwarding?
Before we talk solutions, let’s dissect why port forwarding can be dangerous.
How port forwarding works
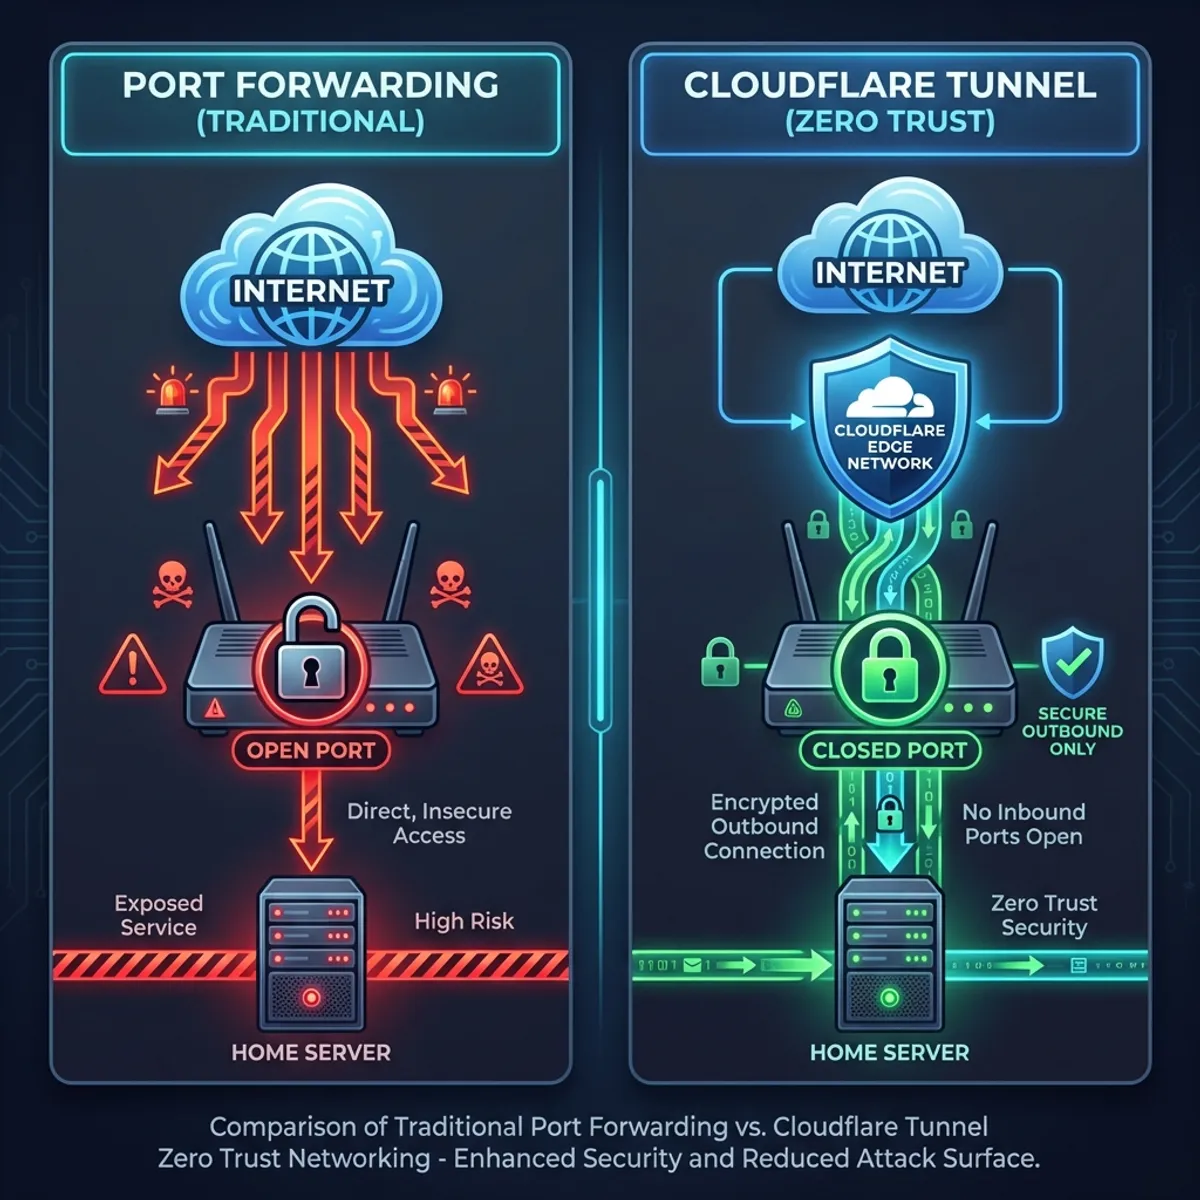
When you open a port on your router (say, port 80 or 443), you’re essentially punching a hole in your NAT firewall. Traffic from the internet can flow directly to a server on your local network.
Internet → Router (Port 80 open) → Local Server (192.168.1.100:80)This works. But here’s the problem:
- Your public IP is directly exposed. Anyone can scan and discover your open ports.
- No additional authentication layer. If your application has a vulnerability, attackers have a straight path in.
- Zero visibility. You won’t know who’s accessing until it’s too late.
I once handled a case where a client’s homelab had been turned into part of a cryptocurrency mining botnet. The cause? Port 22 open with a weak SSH password. Classic, but still happening in 2025.
The reality on the ground
Many sysadmins including my past selfthink: “Come on, who cares about my residential IP? It’s just a small homelab.”
Dead wrong.
Bot scanners don’t care who you are. They scan entire IP ranges, 24/7, looking for open ports. Shodan, Censys, and thousands of rogue scanners out there never stop working. Your home IP is not an exception.
I checked my router logs after that incident. In 24 hours, there were over 4,000 connection attempts to various ports. This isn’t paranoia. This is reality.
Cloudflare tunnel: a different approach
Cloudflare Tunnel (formerly known as Argo Tunnel) is a service that lets you expose local services to the internet without opening any ports on your router.
How IT works
Instead of waiting for incoming connections, Cloudflare Tunnel works on an outbound basis. Your server initiates the connection to Cloudflare’s network, not the other way around.
Local Server → cloudflared daemon → Cloudflare Edge → InternetFrom your router’s firewall perspective:
- No ports open to the internet
- Outbound traffic to Cloudflare just like normal web browsing
- Cloudflare handles incoming connections and forwards them through the tunnel
This is the principle of Zero Trust Networking. You don’t trust the network you verify every connection.
Key advantages
- Public IP is not exposed. Visitors only see Cloudflare’s IPs.
- Built in DDoS protection. Cloudflare filters traffic before it reaches you.
- Automatic HTTPS. Free and automatic SSL certificates.
- Access Control. You can add authentication (email OTP, SSO, etc.) without modifying your app.
- Zero configuration on your router. No need to touch NAT or port forwarding at all.
Implementing Cloudflare tunnel: step by step
Here are the practical steps I use to set up Cloudflare Tunnel in my homelab.
Prerequisites
- A domain added to Cloudflare (even free domains work)
- A Linux server with sudo access
- A Cloudflare account (free tier is sufficient)
Step 1: install cloudflared
# For Debian/Ubuntu
curl -L https://github.com/cloudflare/cloudflared/releases/latest/download/cloudflared-linux-amd64.deb -o cloudflared.deb
sudo dpkg -i cloudflared.deb
Verify the installation:
cloudflared --versionStep 2: log in to Cloudflare
cloudflared tunnel loginThis will open a browser for authentication. Select the domain you want to use.
Step 3: create a tunnel
cloudflared tunnel create homelab-tunnelNote down the tunnel UUID that’s generated. You’ll need it for the configuration.
Step 4: configure the tunnel
Create a config file at ~/.cloudflared/config.yml:
tunnel: <YOUR-TUNNEL-UUID>
credentials-file: /home/<USER>/.cloudflared/<UUID>.json

ingress:
  # Web app on port 3000
  - hostname: app.mydomain.com
    service: http://localhost:3000

  # Grafana dashboard
  - hostname: grafana.mydomain.com
    service: http://localhost:3001

  # SSH via browser (optional)
  - hostname: ssh.mydomain.com
    service: ssh://localhost:22

  # Catch-all (mandatory at the bottom)
  - service: http_status:404
Step 5: create DNS records
cloudflared tunnel route dns homelab-tunnel app.mydomain.com
cloudflared tunnel route dns homelab-tunnel grafana.mydomain.com
Step 6: run the tunnel
cloudflared tunnel run homelab-tunnelFor production, run it as a service:
sudo cloudflared service install
sudo systemctl enable cloudflared
sudo systemctl start cloudflared
Now, you can access https://app.mydomain.com from anywhere, without a single port open on your router!
Adding security layers: Cloudflare access
One feature that made me fall in love with Cloudflare Tunnel is Cloudflare Access. It allows you to add authentication in front of any web application, even ones without a built in login system.
Basic access policy setup
- Go to Cloudflare Dashboard → Zero Trust → Access → Applications
- Click “Add an application” → Self hosted
- Enter the subdomain (e.g.,
grafana.mydomain.com) - Create a policy:
- Allow if email ends with
@mydomain.com - Or use One time PIN (OTP) sent to specific emails
- Allow if email ends with
Now, before anyone can access Grafana, they must pass Cloudflare’s authentication first. Even if Grafana itself has no password protection, you’re still secure.
This is incredibly useful for internal applications that shouldn’t be publicly exposed. I’ve seen admin dashboards wide open without any login. With Cloudflare Access, that problem is solved instantly.
Head-to-head comparison: port forwarding vs Cloudflare tunnel
| Aspect | Port Forwarding | Cloudflare Tunnel |
|---|---|---|
| Open ports on router | ✅ Yes | ❌ No |
| Public IP exposed | ✅ Yes | ❌ No (proxied by Cloudflare) |
| DDoS protection | ❌ No | ✅ Built-in |
| SSL/TLS | Manual setup | ✅ Automatic |
| Additional auth | Manual in app | ✅ Cloudflare Access |
| Setup complexity | Low | Medium |
| Cost | Free | Free (basic tier) |
| Latency | Direct | Additional ~5-20ms |
When port forwarding still makes sense
Honestly, there are situations where port forwarding is still reasonable:
- Gaming servers that need ultra low latency
- Peer to peer applications like torrent seeding
- Situations where you’re in complete control and understand the risks
But for web services, dashboards, APIs, or remote access, Cloudflare Tunnel is almost always the better choice.
Common mistakes i’ve seen
After helping several friends set up their homelabs, here are the common mistakes I keep seeing:
Forgetting the catch all in ingress
The ingress configuration must end with a catch all rule. Without it, cloudflared will error out.
ingress:
  - hostname: app.domain.com
    service: http://localhost:3000
  - service: http_status:404  # MANDATORY
Not setting up as a service
Running cloudflared tunnel run in a terminal means the tunnel dies when the terminal closes. Always install it as a systemd service for production.
Using the wrong local IP
Make sure you use localhost or 127.0.0.1, not your server’s LAN IP. cloudflared runs on the same server as the application.
Integrating with other tools
Cloudflare Tunnel plays nicely with other tools you might already be using.
With Docker
Run cloudflared as a container:
# docker-compose.yml
services:
  cloudflared:
    image: cloudflare/cloudflared:latest
    command: tunnel --config /etc/cloudflared/config.yml run
    volumes:
      - ./cloudflared:/etc/cloudflared
    restart: unless-stopped
    network_mode: host
To understand Docker more deeply, especially if you’re just getting started, I’ve written a Docker guide from scratch that covers containerization fundamentals.
With a reverse proxy (traefik/NGINX)
You can place Cloudflare Tunnel in front of an existing reverse proxy:
ingress:
  - hostname: "*.mydomain.com"
    service: http://localhost:80  # Traefik/Nginx
  - service: http_status:404
Let Traefik or Nginx handle internal routing Cloudflare Tunnel just serves as the entry point.
Monitoring and troubleshooting
Check tunnel status
cloudflared tunnel info homelab-tunnelView real-time logs
sudo journalctl -u cloudflared -fDebug mode
If something isn’t working, run with verbose logging:
cloudflared tunnel --loglevel debug run homelab-tunnelCommon issues
- 502 Bad Gateway: The target application isn’t running or the port is wrong
- Tunnel disconnected: Check your internet connection, restart cloudflared service
- DNS not resolving: Make sure the DNS record was created via
tunnel route dns
Lessons i’ve learned
After migrating from port forwarding to Cloudflare Tunnel, here’s what I’ve noticed:
- I sleep better at night. No more paranoia about open ports.
- Maintenance is easier. No router reconfiguration needed when changing ISPs or getting a new IP.
- Access from anywhere. Even on networks that block custom ports, Cloudflare Tunnel works because it uses standard port 443.
Server security doesn’t stop at the tunnel. Make sure you’ve also implemented Linux hardening best practices for deeper defense layers.
Closing thoughts
Port forwarding is a classic technique that’s been around for decades. But in an era where automated attacks happen every second, this approach is outdated for most use cases.
Cloudflare Tunnel offers a more modern and secure way to expose services to the internet. No open ports, no exposed IPs, and you get free DDoS protection plus automatic SSL as a bonus.
Is it a perfect solution? Nothing is perfect. You’re adding a dependency on a third-party service. But the trade off makes a lot of sense for most situations.
Start with one small service. Try exposing a monitoring dashboard or an internal app. Feel the difference. I’m confident you won’t want to go back to port forwarding again.
I hope this guide on Cloudflare Tunnel helps you make better decisions in real-world situations.
Implementation Checklist
- Replicate the steps in a controlled lab before production changes.
- Document configs, versions, and rollback steps.
- Set monitoring + alerts for the components you changed.
- Review access permissions and least-privilege policies.
Official References
Need a Hand?
If you want this implemented safely in production, I can help with assessment, execution, and hardening.
Contact MeAbout the Author
Kamandanu Wijaya
IT Infrastructure & Network Administrator
Infrastructure & network administrator with 14+ years of enterprise experience, focused on stability, security, and automation.
Certifications: Google IT Support, Cisco Networking Academy, DevOps.
View ProfileNeed IT Solutions?
DoWithSudo team is ready to help setup servers, VPS, and your security systems.
Contact Us