Learning Docker from Scratch: Step-by-Step Practical Guide
This article is part of the Production Docker series.
Article Details
Category
DevOpsHave you ever experienced this classic scenario? You write code on your laptop and everything runs perfectly. The moment you hand it over to a colleague or deploy it to a server, everything crashes. And then comes the legendary excuse: “But it works on my machine!”
The problem is usually not your code, but the environment. Maybe the Node.js version is different, the database config doesn’t match, or the OS is a different distro. Docker exists to end this drama once and for all.
This guide is your first 30 minutes with Docker. By the end, you will have Docker installed, your first container running, and your first image built. It is deliberately short and hands-on, the on-ramp, not the highway. For the full picture (production hardening, CI/CD, multi-stage builds), continue to the complete guide after this one.
I wrote this after watching too many developers stall on Docker setup and never get to the fun part. The first container is the hardest, everything after that is just more of the same pattern.
Installing Docker
Docker runs on Linux, macOS, and Windows.
-
Linux (Ubuntu/Debian): the official convenience script works for most setups.
curl -fsSL https://get.docker.com -o get-docker.sh
sudo sh get-docker.sh
Then add yourself to the
dockergroup and re-login so you can rundockerwithoutsudo:sudo usermod -aG docker $USER -
macOS / Windows: download Docker Desktop from the official website and run the installer. It runs a small Linux VM behind the scenes so containers behave identically on every OS.
Verify everything is working:
docker --version
docker run hello-world
If hello-world prints its welcome message, Docker is ready. Fun fact: that tiny image was your first container, you just ran one without realizing it.
Your first container
Time for something real. Let’s run an Nginx web server without installing Nginx anywhere on your machine:
docker run -d -p 8080:80 nginxWhat just happened:
docker run: start a container from an image.-d: detached, run it in the background so your terminal stays free.-p 8080:80: port mapping, port 8080 on your laptop forwards to port 80 inside the container.nginx: the image to use. Docker pulled it from Docker Hub automatically, then started a container from it.
Now open http://localhost:8080 in your browser. Welcome to nginx! You just ran a web server without polluting your operating system.
Stop it before moving on:
docker stop $(docker ps -q) # stops all running containersA few commands you will use constantly:
docker ps          # list running containers
docker ps -a       # list all containers, including stopped ones
docker stop <id>   # stop a running container
docker rm <id>     # delete a stopped container
docker images      # list images you have pulled
docker pull ubuntu # download an image without running it
docker rmi <id>    # delete an image you no longer need
Tip:
docker psonly shows running containers. Add-ato see stopped ones too. This trips up everyone at least once, you think a container vanished, but it is just stopped.
The one mental model: image vs container
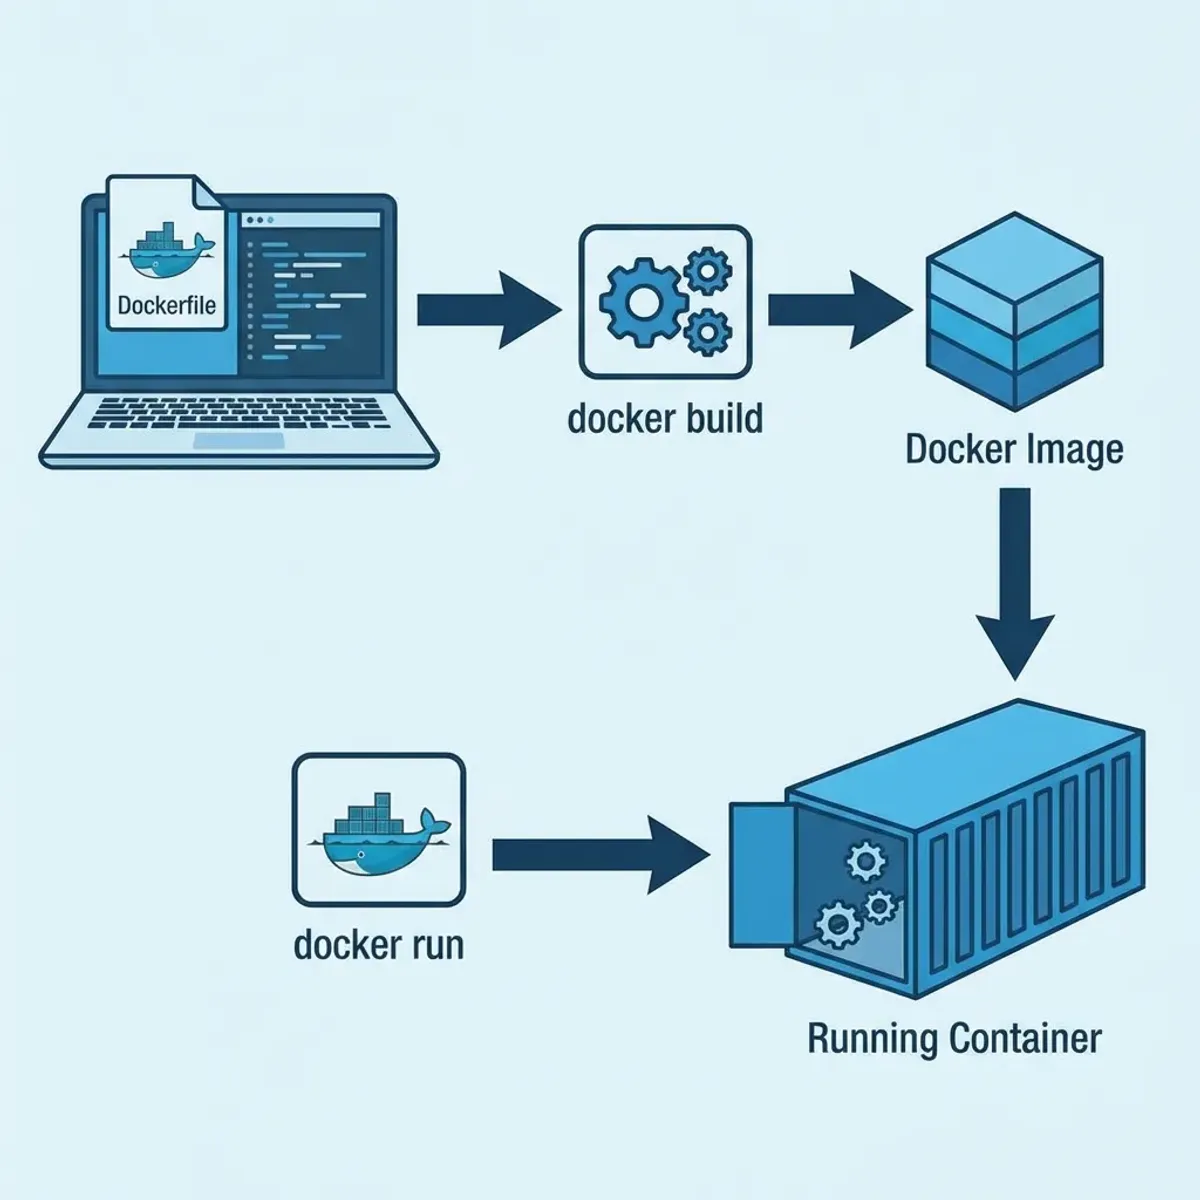
Lock this in: image is the read-only blueprint, container is a running instance with a thin writable layer. Delete a container and its data disappears. The image stays. That single fact explains half of Docker’s design.
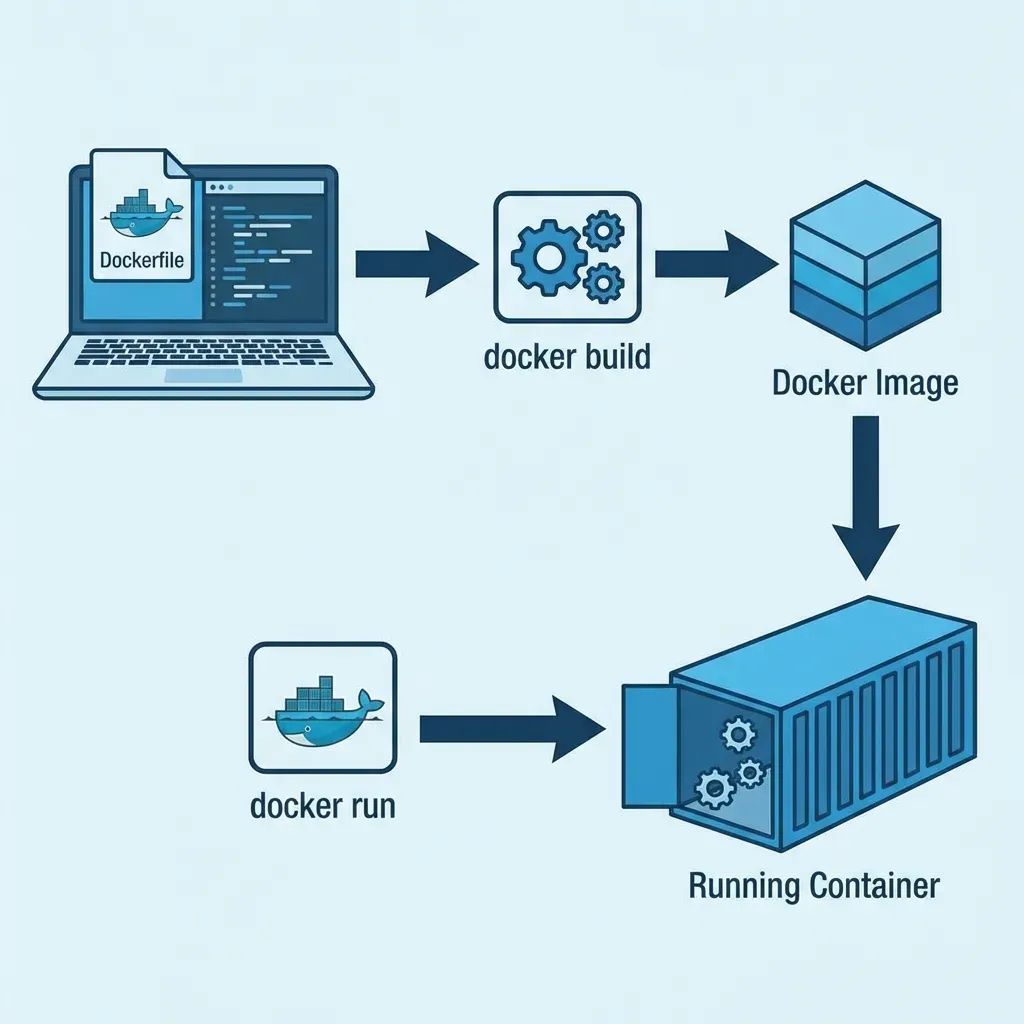
Docker vocabulary cheat sheet
When you see these words elsewhere, here is what they mean:
| Term | Meaning |
|---|---|
| Image | The read-only blueprint (like an installer ISO) |
| Container | A running instance of an image |
| Dockerfile | The recipe file that defines how an image is built |
| Volume | Docker-managed storage that survives container deletion |
| Registry | Where images are stored and shared (Docker Hub is the default) |
| Docker Engine | The daemon that manages images, containers, networks, and volumes |
| Docker Compose | A tool to define and run multi-container apps from one file |
| Tag | A version label for an image (e.g., nginx:1.27 vs nginx:latest) |
No need to memorize this table. Bookmark it and come back when a term confuses you.
Your first Dockerfile
Using someone else’s image is easy. Packaging your own app is just as easy, you write a file called Dockerfile. Here is a minimal one for a Node.js app:
# 1. Start from a base image (OS + Node.js)
FROM node:18-alpine

# 2. Working directory inside the container
WORKDIR /app

# 3. Copy your package.json first, then install dependencies
COPY package.json .
RUN npm install

# 4. Copy the rest of the app code
COPY . .

# 5. Expose the port the app listens on
EXPOSE 3000

# 6. Start the app
CMD ["node", "app.js"]
Build it into an image, then run it:
docker build -t my-app:v1 .
docker run -p 3000:3000 my-app:v1
The -t my-app:v1 flag names the image so you can reference it later instead of by a random ID. Open http://localhost:3000 and your app is running inside a container, the same image that will eventually run on any server.
That is the whole loop: write a Dockerfile, build an image, run a container. Everything else, layer caching tricks, multi-stage builds, and slimming images down, is optimization that you can pick up later when needed.
Three things you’ll meet soon
Docker’s surface area is bigger than this guide, but here is the map so nothing surprises you:
- Volumes: containers are ephemeral, delete one and its data is gone. Volumes are Docker-managed storage that survives container death. You will want them the first time you run a database.
- Networking: containers talk to each other over a private bridge network, and you use
-pto reach them from your machine. Special modes (host,none) exist for edge cases. - Docker Compose: when your app grows past one container (web + database + cache), you define the whole stack in a
docker-compose.ymland start it with a single command instead of a pile ofdocker runs.
Don’t learn all three today. Know they exist, and pick them up when a real project needs them, the complete guide walks through each with full examples, including a production compose file with healthchecks.
Common beginner mistakes
These five mistakes account for most “why is my container not working?” questions:
- Forgetting to expose ports. Container running but unreachable? You probably skipped
-p. Containers are isolated, you must poke a hole for traffic. Just be careful which holes you poke, for a safer way to expose services, see my Cloudflare Tunnel vs port forwarding comparison. - Binding code instead of copying it. In development, you can mount your code into the container so edits apply instantly. In production, copy the code into the image (
COPY) so the image is consistent and immutable. - Copying everything before installing dependencies. Put
package.jsonand the install step BEFORECOPY . .so Docker reuses the cached layer when only your code changes. Otherwise every build reinstalls everything from scratch. - Running as root. Add a non-root user in your Dockerfile (
USER node). It is one line that removes a whole class of problems. The complete guide’s hardening section shows the production-grade version. - No resource limits. In production, set
--memoryand--cpusso one container can’t starve the host. I learned this one the hard way, a missing memory limit took down a production service at night, and I wrote up the whole incident in my Docker container crash case study.
Quick cleanup commands
After experimenting, you will end up with stopped containers and dangling images eating disk space. Run these to keep your machine tidy:
docker container prune   # remove all stopped containers
docker image prune       # remove dangling (untagged) images
docker system prune      # nuclear option: removes stopped containers, dangling images, and unused networks
Running docker system prune once a week is a good habit, especially on a dev laptop where you build and tear down containers constantly.
What’s next?
You now have the on-ramp: Docker installed, your first container running, your first image built, and the common pitfalls in your head. That is genuinely the hard part, most people quit before their first docker run.
From here, the path is:
- Read the Docker complete guide: the full reference that continues from this tutorial: production hardening, healthchecks, CI/CD, multi-stage builds, backups, and more.
- Deploy something real: I documented a full production deployment of a MERN application to DigitalOcean in the MERN migration case study.
- Keep your learning steady: if the whole cloud/DevOps landscape feels overwhelming, my cloud learning tips for beginners shows how to build skills step by step without burning out.
And when something breaks, it will, remember: docker logs <container_id> is your best friend.
One last tip: bookmark the official Docker docs alongside this guide. The reference material there complements this walkthrough and saves you hours when you hit an unfamiliar flag.
This article is part of the Production Docker series.
Implementation Checklist
- Replicate the steps in a controlled lab before production changes.
- Document configs, versions, and rollback steps.
- Set monitoring + alerts for the components you changed.
- Review access permissions and least-privilege policies.
Official References
Need a Hand?
If you want this implemented safely in production, I can help with assessment, execution, and hardening.
Contact MeDeploy on Cloud Infrastructure with $200 Free Credit
Spin up high-performance SSD cloud Droplets, managed Kubernetes, and databases in seconds. Test your containers and production workloads with $200 in free credits.
Transparency: We independently test and operate all recommended infrastructure. If you use our partner links, you receive free promotional credits and support our testing lab at zero extra cost to you.
Weekly Production DevOps Runbooks
Join 1,000+ infrastructure engineers receiving real-world Linux troubleshooting, Proxmox clustering setups, and Docker optimization runbooks every Tuesday. Zero spam, unsubscribe anytime.
About the Author
Kamandanu Wijaya
IT Infrastructure & Network Administrator
Infrastructure & network administrator with 15+ years of enterprise experience, focused on stability, security, and automation.
Certifications: Google IT Support, Cisco Networking Academy, DevOps.
LVM Storage Recovery: Missing Volume Groups and Disks
Next →Learning Ansible: Automate Operational Pain
Need IT Solutions?
DoWithSudo is ready to help setup servers, VPS, and your security systems.
Contact Us